在这篇指南中,你将获得使用 Kubernetes 和 Istio 使用 GitOps 进行渐进式交付(Progressive Delivery)的实际经验。
介绍
Demo: https://github.com/stefanprodan/gitops-istio
GitOps 是什么?
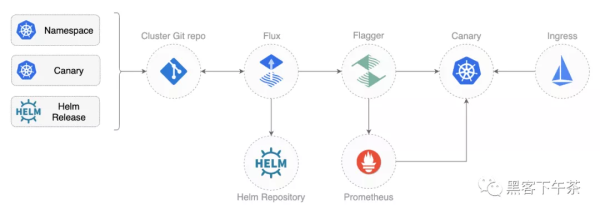
GitOps 是一种进行持续交付的方式,它使用 Git 作为声明性(declarative)基础设施和工作负载(workloads)的真实来源。对于 Kubernetes,这意味着使用 git push 而不是 kubectl apply/delete 或 helm install/upgrade。
在这个 workshop 中,您将使用 GitHub 来托管配置存储库,并将 Flux 作为 GitOps 交付解决方案。
什么是渐进式交付?
渐进交付是高级部署模式(如金丝雀canaries、功能标志feature flags和A/B测试A/B testing)的总称。渐进交付技术通过让应用程序开发人员和 SRE 团队对爆炸半径blast radius进行细粒度控制,从而降低在生产中引入新软件版本的风险。
在这个 workshop 中,您将使用 Flagger 和 Prometheus 为您的应用程序自动执行 Canary 发布和 A/B Testing。
准备工作
您将需要具有 LoadBalancer 支持的 Kubernetes 集群 v1.16 或更高版本。出于测试目的,您可以使用带有 2 个 CPU 和 4GB 内存的 Minikube。
使用 Homebrew 安装 flux CLI:
brewinstallfluxcd/tap/flux
macOS AMD64/ARM64、Linux AMD64/ARM 和 Windows 的二进制文件可在 flux2 release page 下载。
验证您的集群是否满足前提条件:
fluxcheck–pre
使用 Homebrew 安装 jq 和 yq:
brewinstalljqyq
Fork 这个仓库并克隆它:
gitclonehttps://github.com//gitops-istiocdgitops-istio Cluster bootstrap
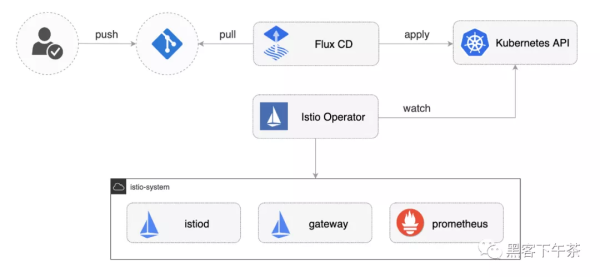
使用 flux bootstrap 命令,您可以在 Kubernetes 集群上安装 Flux 并将其配置为从 Git 存储库管理自身。如果集群上存在 Flux 组件,则 bootstrap 命令将在需要时执行升级。
通过指定您的 GitHub 存储库 fork URL 来引导 Flux:
fluxbootstrapgit–author-email=–url=ssh://git@github.com//gitops-istio–branch=main–path=clusters/my-cluster
上面的命令需要 ssh-agent,如果您使用的是 Windows,请参阅 flux bootstrap github 文档。
在引导时,Flux 生成一个 SSH key 并打印 public key。为了用 git 同步你的集群状态,你需要复制 public key 并使用 write 创建一个 deploy key 访问你的 GitHub 仓库。在 GitHub 上转到 Settings > Deploy keys 点击 Add deploy key, 勾选☑️ Allow write access,粘贴 Flux public key 并单击 Add key。
当 Flux 访问你的存储库时,它会做以下事情:
安装 Istio operator 等待 Istio 控制平面准备好 安装 Flagger、Prometheus 和 Grafana 创建 Istio 公共网关 创建 prod 命名空间namespace 创建负载测试器(load tester) deployment 创建前端(frontend) deployment 和金丝雀canary 创建后端(backend) deployment 和金丝雀canary
使用 Istio 引导集群时,定义 apply 顺序很重要。对于要使用 Istio sidecar 注入的应用程序 pod,Istio 控制平面必须在应用程序之前启动并运行。
在 Flux v2 中,你可以通过定义对象之间的依赖关系来指定执行顺序。例如,在 clusters/my-cluster/apps.yaml 中我们告诉 Flux,apps 的协调取决于一个 istio-system :
apiVersion:kustomize.toolkit.fluxcd.io/v1beta1kind:Kustomizationmetadata:name:appsnamespace:flux-systemspec:interval:30m0sdependsOn:-name:istio-systemsourceRef:kind:GitRepositoryname:flux-systempath:./apps
首先观测 Flux 安装 Istio,然后观测 demo apps:
watchfluxgetkustomizations
您可以使用以下命令跟踪 Flux reconciliation 日志:
fluxlogs–all-namespaces–follow–tail=10 Istio 定制和升级
您可以使用位于 istio/system/profile.yaml 的 IstioOperator 资源自定义 Istio 安装:
apiVersion:install.istio.io/v1alpha1kind:IstioOperatormetadata:name:istio-defaultnamespace:istio-systemspec:profile:democomponents:pilot:k8s:resources:requests:cpu:10mmemory:100Mi
修改 Istio 设置后,您可以将更改推送到 git,Flux 将在集群上应用它。Istio operator 将根据您的更改重新配置 Istio 控制平面。
当新的 Istio 版本可用时,update-istio GitHub Action workflow 工作流将打开一个pull request,其中包含升级 Istio Operator 所需的清单更新。新的 Istio 版本通过 e2e workflow 在 Kubernetes Kind 上进行测试,当 PR 合并到主分支时,Flux 将在集群内升级 Istio。
应用程序引导
当 Flux 将 Git 存储库与您的集群同步时,它将创建前端/后端部署(frontend/backend deployment)、HPA 和一个金丝雀对象canary object。Flagger 使用 canary 定义创建了一系列对象:Kubernetes deployments、ClusterIP services、Istio 目标规则(destination rules)和虚拟服务(virtual services)。这些对象在网格(mesh)上公开(expose)应用程序,并推动金丝雀分析(canary analysis)和推广(promotion)。
#appliedbyFluxdeployment.apps/frontendhorizontalpodautoscaler.autoscaling/frontendcanary.flagger.app/frontend#generatedbyFlaggerdeployment.apps/frontend-primaryhorizontalpodautoscaler.autoscaling/frontend-primaryservice/frontendservice/frontend-canaryservice/frontend-primarydestinationrule.networking.istio.io/frontend-canarydestinationrule.networking.istio.io/frontend-primaryvirtualservice.networking.istio.io/frontend
检查 Flagger 是否成功初始化了金丝雀:
kubectl-nprodgetcanariesNAMESTATUSWEIGHTbackendInitialized0frontendInitialized0
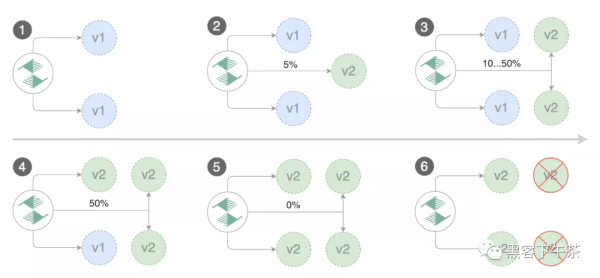
当 frontend-primary 部署上线时,Flager 会将所有流量路由到主 Pod,并将 frontend 部署 scale 到零。
使用以下命令查找 Istio 入口网关(ingress gateway)地址:
kubectl-nistio-systemgetsvcistio-ingressgateway-ojson|jq.status.loadBalancer.ingress
打开浏览器并导航到入口地址,您将看到前端 UI。
金丝雀发布
Flagger 实现了一个控制循环,该控制循环在测量关键性能指标(如 HTTP 请求成功率、请求平均持续时间和 pod 运行状况)的同时,逐步将流量转移到金丝雀。在分析 KPI 的基础上,将金丝雀升级或中止,并将分析结果发布到 Slack。
金丝雀分析由以下任何对象的更改触发:
部署 PodSpec(容器镜像、命令、端口、环境等)
ConfigMaps 和 Secrets 作为卷(volumes)挂载或映射到环境变量
对于不接收恒定流量的工作负载,Flagger 可以配置一个 webhook,当它被调用时,将启动一个目标工作负载的负载测试。canary 配置可以在 apps/backend/canary.yaml 上找到。
从 GitHub 拉取更改:
gitpulloriginmain
要触发后端应用程序的金丝雀部署,请碰撞容器镜像:
yqe\’.images[0].newTag=\”5.0.1\”\’-i./apps/backend/kustomization.yaml
提交和推送更改:
gitadd-A&&gitcommit-m\”backend5.0.1\”&&gitpushoriginmain
告诉 Flux 拉取更改或等待一分钟让 Flux 自行检测更改:
fluxreconcilesourcegitflux-system
观测 Flux 将您的集群与最新提交进行协调:
watchfluxgetkustomizations
几秒钟后,Flager 检测到部署修订(deployment revision)已更改并开始新的 rollout:
$kubectl-nproddescribecanarybackendEvents:Newrevisiondetected!Scalingupbackend.prodStartingcanaryanalysisforbackend.prodPre-rolloutcheckconformance-testpassedAdvancebackend.prodcanaryweight5…Advancebackend.prodcanaryweight50Copyingbackend.prodtemplatespectobackend-primary.prodPromotioncompleted!Scalingdownbackend.prod
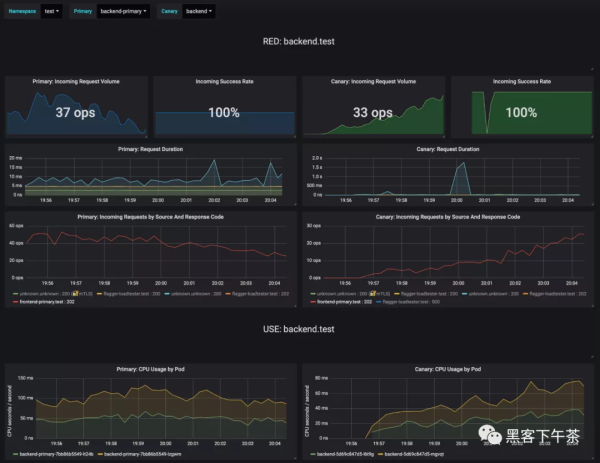
在分析过程中,Grafana 可以监控金丝雀的进程。您可以通过端口转发访问仪表板:
kubectl-nistio-systemport-forwardsvc/flagger-grafana3000:80
Istio 仪表板的 URL 是 http://localhost:3000/d/flagger-istio/istio-canary?refresh=10s&orgId=1&var-namespace=prod&var-primary=backend-primary&var-canary=backend
请注意,如果在金丝雀分析(canary analysis)期间对部署应用了新的更改,Flagger 将重新启动分析阶段。
A/B 测试
除了加权路由(weighted routing),Flagger 还可以配置为根据 HTTP 匹配条件将流量路由到金丝雀。在 A/B 测试场景中,您将使用 HTTP headers 或 cookie 来定位用户的特定部分。这对于需要会话(session)关联的前端应用程序特别有用。
您可以通过指定 HTTP 匹配条件和迭代次数来启用 A/B 测试:
analysis:#scheduleinterval(default60s)interval:10s#maxnumberoffailedmetricchecksbeforerollbackthreshold:10#totalnumberofiterationsiterations:12#canarymatchconditionmatch:-headers:user-agent:regex:\”.*Firefox.*\”-headers:cookie:regex:\”^(.*?;)?(type=insider)(;.*)?$\”
上述配置将针对 Firefox 用户和拥有内部 cookie 的用户运行两分钟的分析。前端配置可以在 apps/frontend/canary.yaml 中找到。
通过更新前端容器镜像触发部署:
yqe\’.images[0].newTag=\”5.0.1\”\’-i./apps/frontend/kustomization.yamlgitadd-A&&gitcommit-m\”frontend5.0.1\”&&gitpushoriginmainfluxreconcilesourcegitflux-system
Flager 检测到部署修订已更改并开始 A/B 测试:
$kubectl-nistio-systemlogsdeploy/flagger-f|jq.msgNewrevisiondetected!Scalingupfrontend.prodWaitingforfrontend.prodrollouttofinish:0of1updatedreplicasareavailablePre-rolloutcheckconformance-testpassedAdvancefrontend.prodcanaryiteration1/10…Advancefrontend.prodcanaryiteration10/10Copyingfrontend.prodtemplatespectofrontend-primary.prodWaitingforfrontend-primary.prodrollouttofinish:1of2updatedreplicasareavailablePromotioncompleted!Scalingdownfrontend.prod
您可以通过以下方式监控所有金丝雀:
$watchkubectlgetcanaries–all-namespacesNAMESPACENAMESTATUSWEIGHTprodfrontendProgressing100prodbackendSucceeded0 基于 Istio 指标的回滚
Flagger 使用 Istio 遥测提供的指标来验证金丝雀工作负载。前端应用 analysis 定义了两个指标检查:
metrics:-name:error-ratetemplateRef:name:error-ratenamespace:istio-systemthresholdRange:max:1interval:30s-name:latencytemplateRef:name:latencynamespace:istio-systemthresholdRange:max:500interval:30s
用于检查错误率(error rate)和延迟的 Prometheus 查询,位于 flagger-metrics.yaml
在金丝雀分析期间,您可以生成 HTTP 500 errors 和高延迟(high latency)来测试 Flagger 的回滚。
生成 HTTP 500 errors:
watchcurl-b\’type=insider\’http:///status/500
生成延迟:
watchcurl-b\’type=insider\’http:///delay/1
当失败的检查次数达到金丝雀分析阈值(threshold)时,流量将路由回主服务器,金丝雀缩放为零,并将推出(rollout)标记为失败。
$kubectl-nistio-systemlogsdeploy/flagger-f|jq.msgNewrevisiondetected!Scalingupfrontend.prodPre-rolloutcheckconformance-testpassedAdvancefrontend.prodcanaryiteration1/10Haltfrontend.prodadvancementerror-rate31>1Haltfrontend.prodadvancementlatency2000>500…Rollingbackfrontend.prodfailedchecksthresholdreached10Canaryfailed!Scalingdownfrontend.prod
您可以使用针对 Prometheus、Datadog 和 Amazon CloudWatch 的自定义指标检查来扩展分析。
有关为 Slack、MS Teams、Discord 或 Rocket 配置 canary 分析警报的信息,请参阅文档。
